")


I remember when I started in photography, I was always so curious about how legit photographers did what they did. I’d ask myself questions like, “How did they set their cameras up? What actual settings were they using? How do their images look so great SOOC?
I remember thinking things like, “I’d be embarrassed to show a client the back of my camera during a shoot…”
But now? I post my SOOC’s gladly for the world to see, and ALWAYS show my client’s the back of my camera when I’m shooting! ?
So, if you’ve been asking yourself those questions too, friend– you’re in for a treat. ?
Without further ado, let’s dive into the four settings I set up first when shooting in manual mode on my camera:
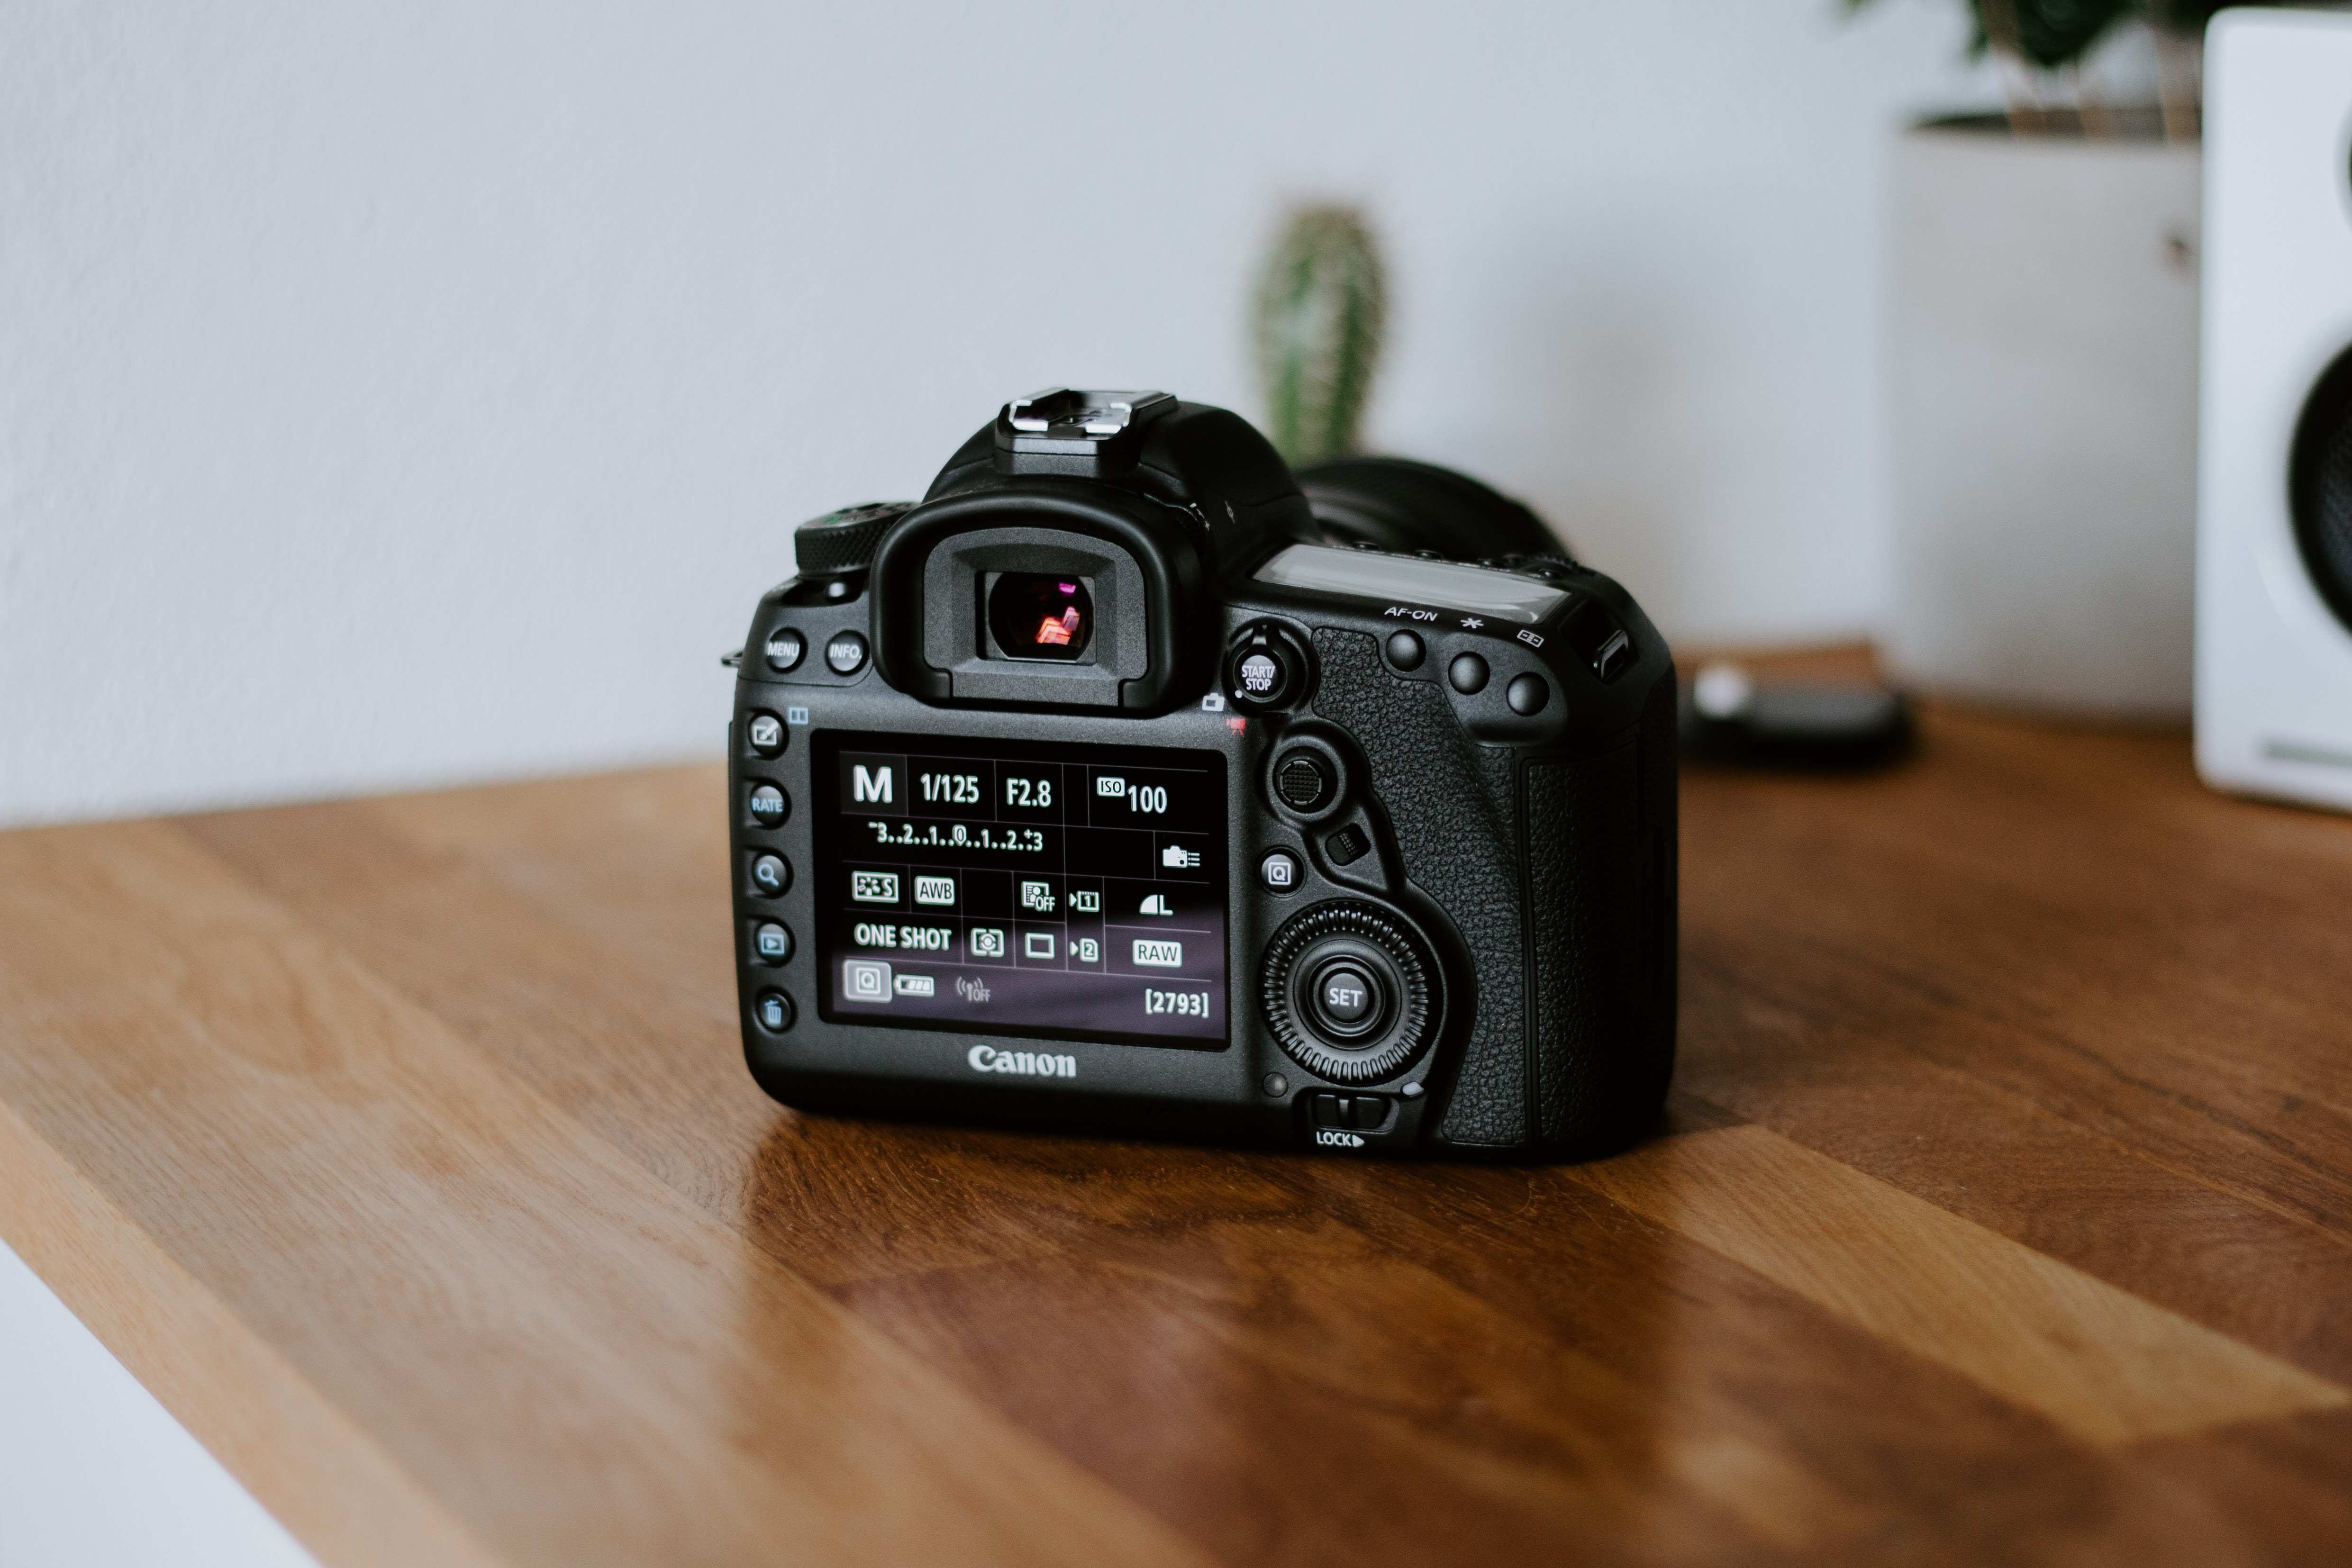
There are three major settings you’ll need to constantly be adjusting when shooting in manual mode, and one minor one that I simply prefer to adjust just for an easier workflow.
These four settings, when used correctly, allow you to create killer images vs.just okay ones. They’re everything… and if you don’t know how to use them– start learning today.
Seriously. You’ll wish you would’ve yesterday.
Here they are, in the order I set them up:
1. ISO
2. Aperture
3. Shutter Speed
4. White Balance
Now, the thing about camera settings is they’re ALWAYS dependent on not only what you’re shooting (the subject,) but what time of day you’re shooting as well (morning/afternoon/evening/night.)
That means that settings are never a “one size fits all” approach. Meaning, you can’t just Google “camera settings for senior portraits at 5:00pm,” – get exactly what you need, and then use it religiously every time.
Settings don’t stick like glue for every situation.
Let’s say you googled the above statement, and an article told you “for a senior portrait at 5:00 pm, use ISO: 100, SS 1/1250 and aperture 4.0”
So you take a photo with those exact settings… but you can’t see a thing. It’s all black. Too dark.
Well, chances are the guy telling you those settings was shooting in a completely different environment, with completely different external factors.
But, you can read up on the settings of different shots you love, and see what types of images you’re naturally drawn to.
For instance, I’m a huge fan of shots that are taken with a wide open aperture (meaning the subject is in focus, and the background is blurry.) I’ve always really been drawn to them, and they’re my favorite type of images to create. I love for my subjects to “pop off” the background because I really believe it’s a big part of what gives my images the “wow-factor” I’ve worked so hard for!
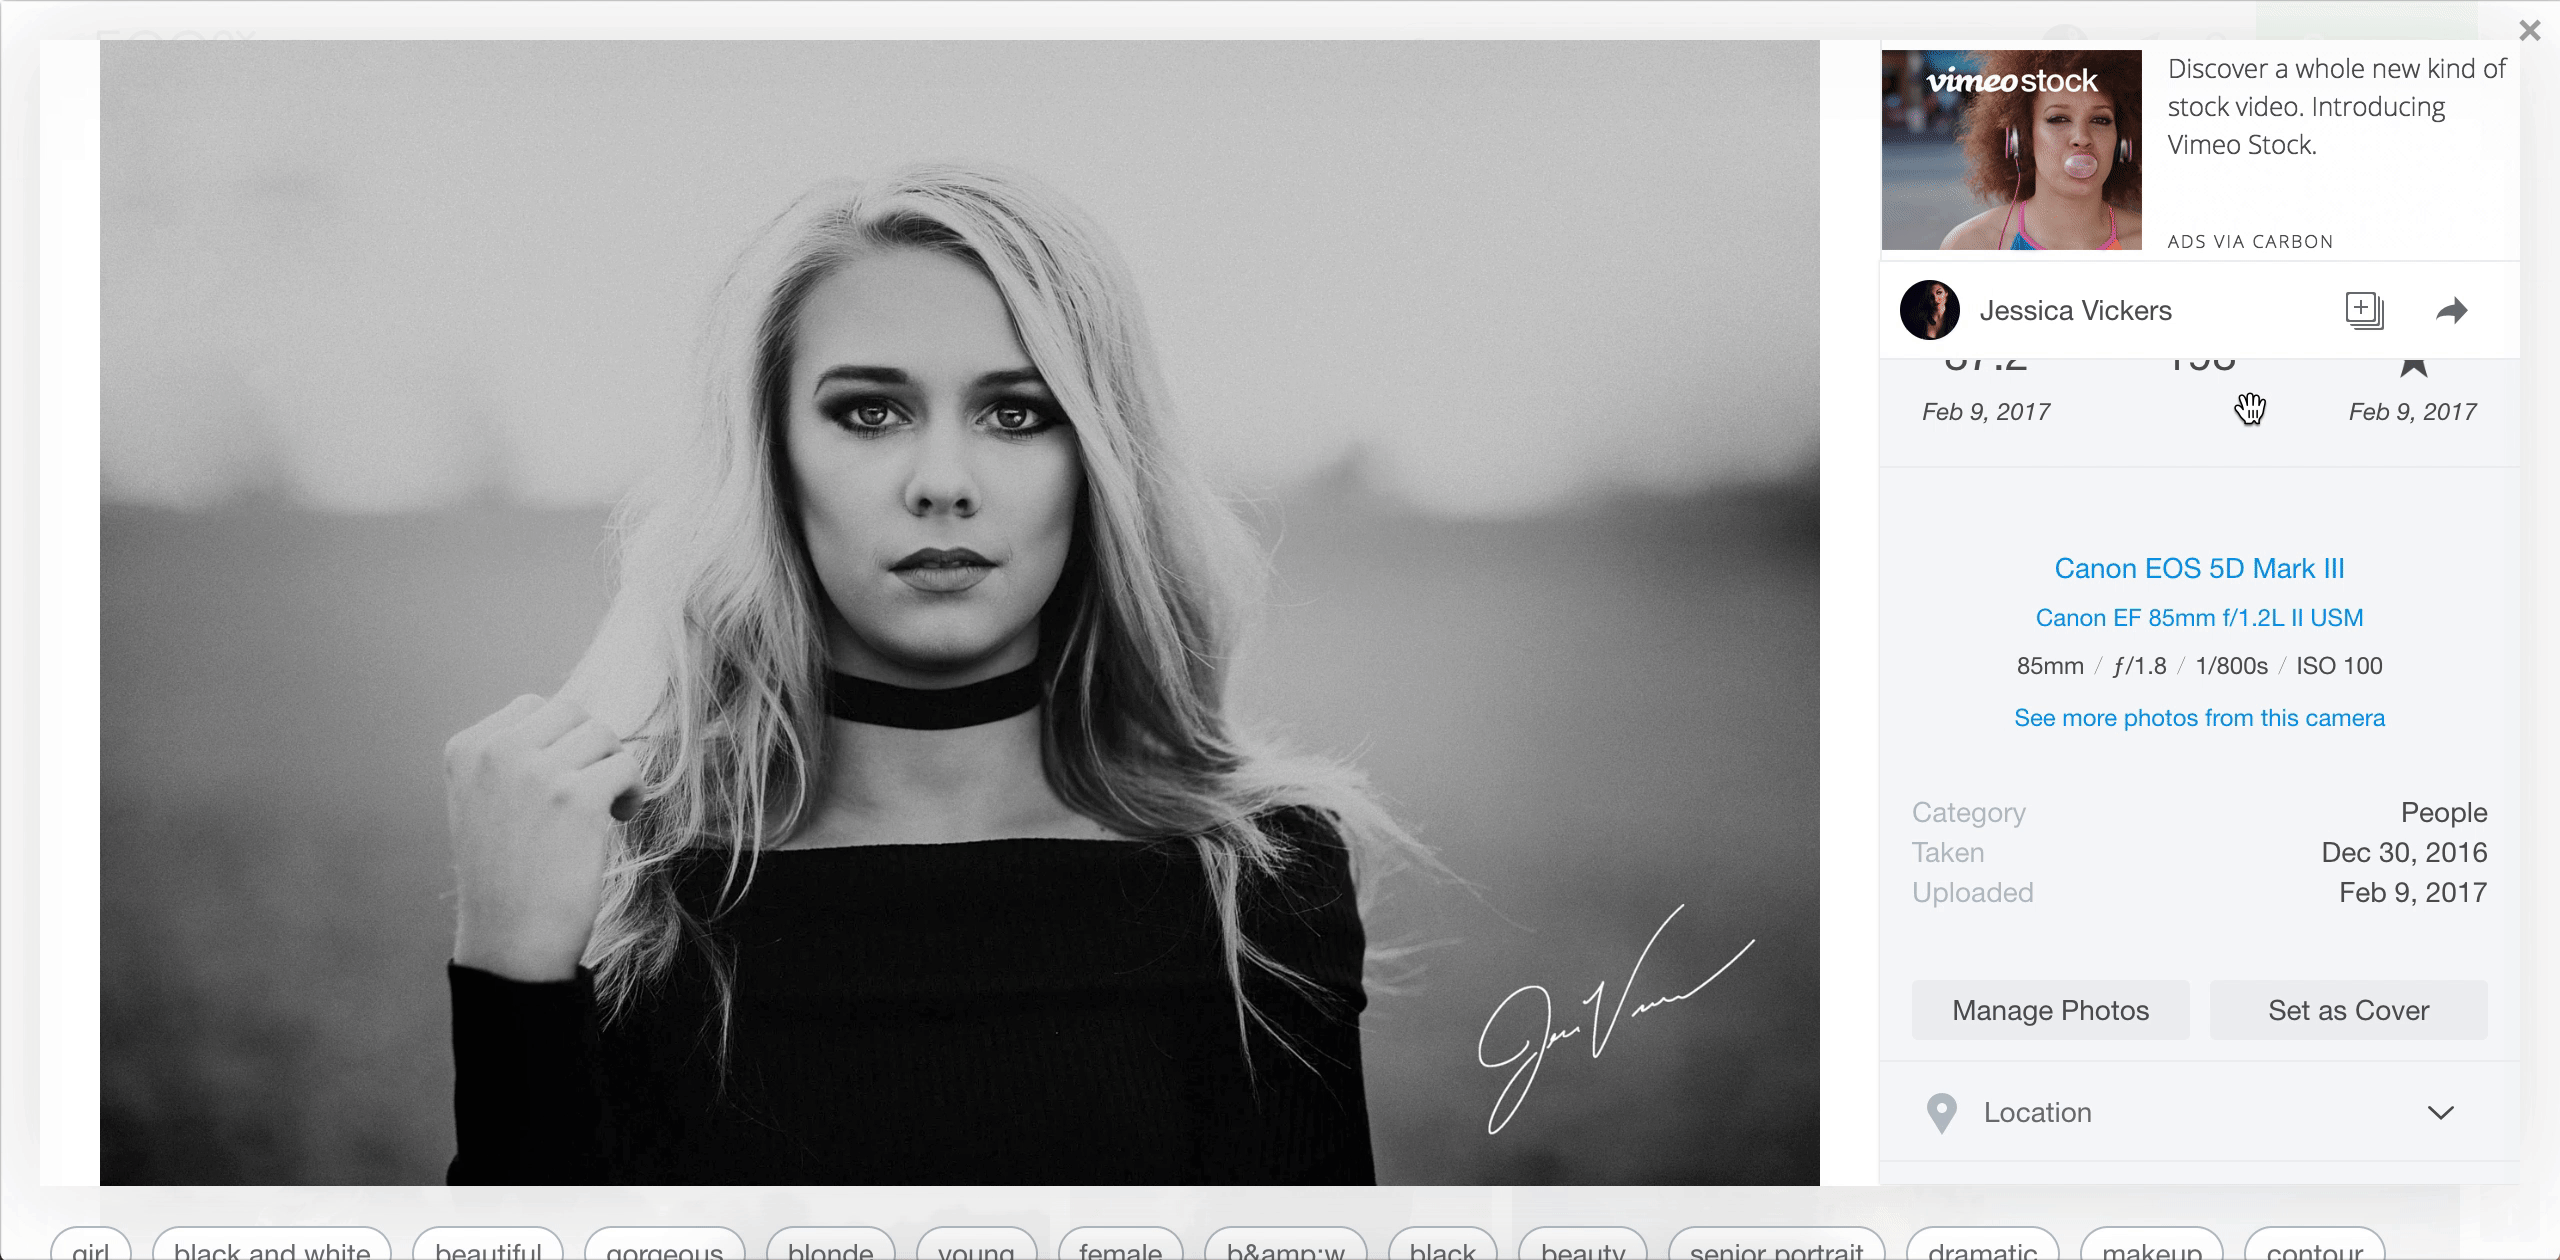
Pro Tip: Go to 500px and type in some different types of photos (i.e. senior portraits, family portraits, engagement portraits, etc.) in the search bar. Once you find some you love, click the heart button beside them, and create a collection of the images you are the most drawn to.
When you’ve gotten about 20-25 images selected, go into your collection and see what the settings were for each individual shot (if they’re available, sometimes they aren’t,) as well as the equipment the image was shot on. (See the video example below; I show you where to find the settings if they’re available!)
Write them down, and be sure to take note of the type of light that the shots are taken in, (natural light vs. artificial light (a.k.a. Studio lighting) You’ll start to see a pattern, and it’ll help you find your style without even knowing it! 😉
Let’s take a look into the process of the four exact settings I set up first in camera when shooting in manual, along with why. Starting with:
1. ISO
A rule of thumb for me is that my ISO is always going to be set as low as possible. That means that 80% of the time it’s set to 100, because that’s as low as I can set it in my camera.
Two reasons why:
– ISO is one of the primary contributing factors to noise/grain in your images. I’m not a fan of that. If I decide I want it, I’ll add it in post-processing, but I def don’t want my images having it straight out of camera.
– I generally always know what I want it to be, so it’s easy to just pop that one right into place and start with 100, then adjust from there.
The second of the four settings I set up first when shooting in manual mode:
2. Aperture
If I want the background in my images to be blurry, that means my aperture is going to be as low as possible. Therefore, I’m typically shooting between 1.8-2.2. That’s generally my starting point, and then I compensate with my other settings to get a correct exposure.
Here’s an example of a photo shot with a wide open aperture:
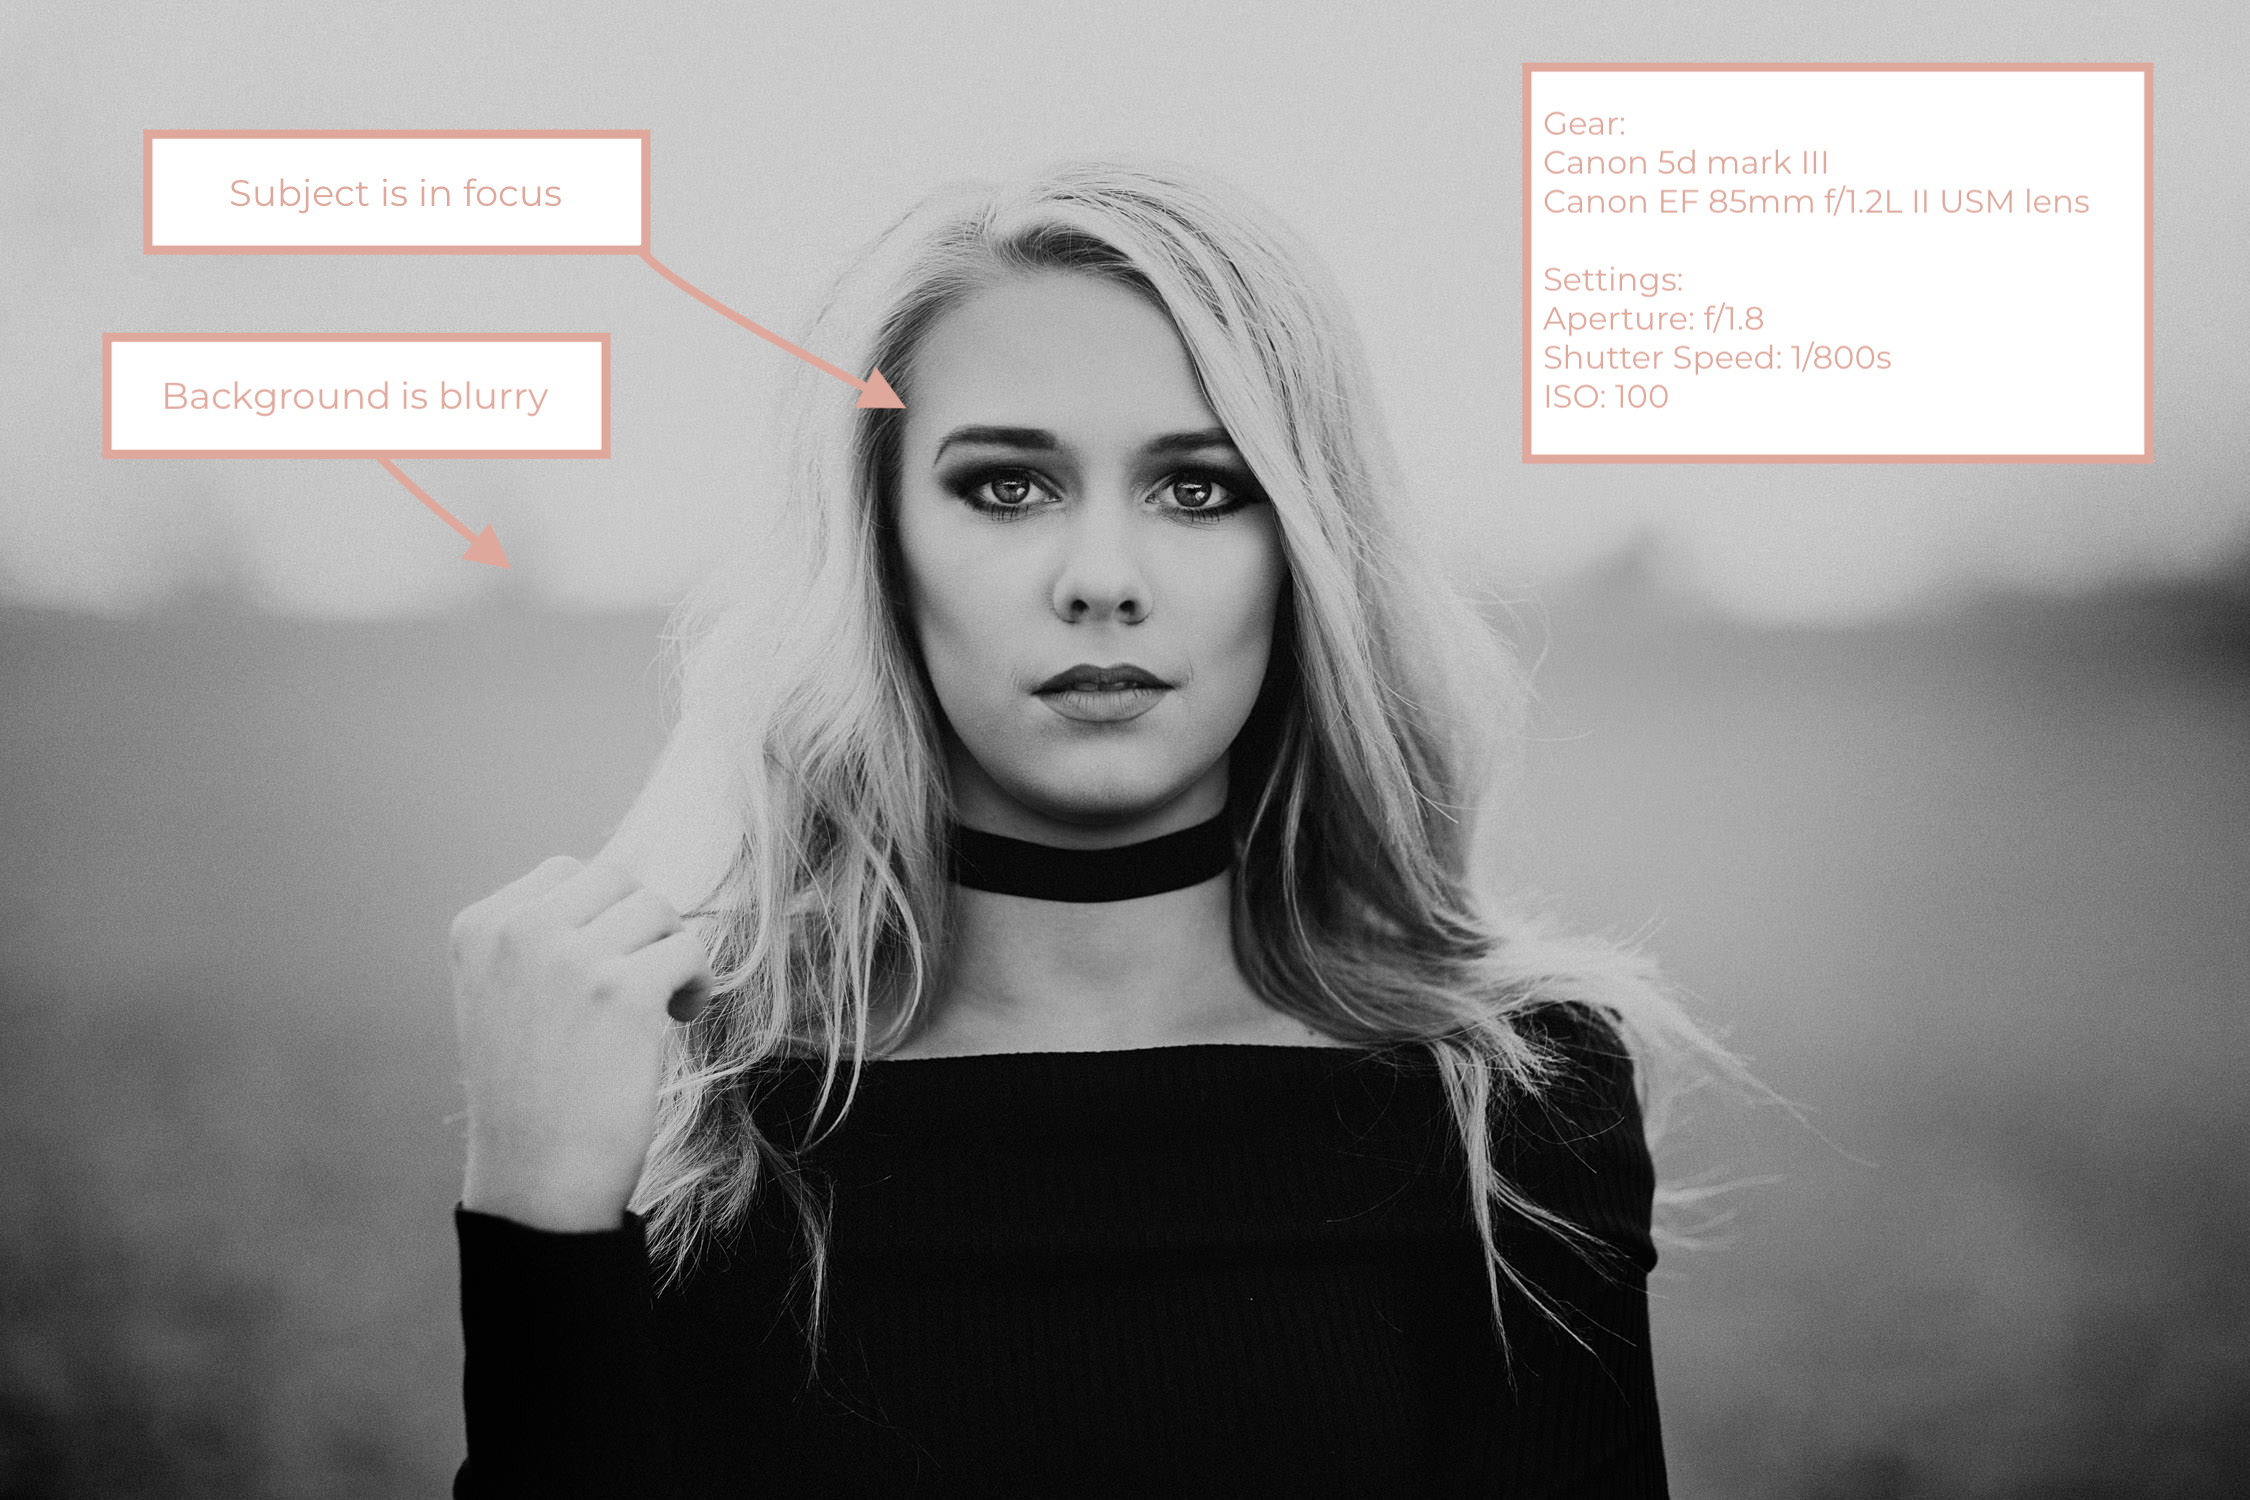
You may notice your lens doesn’t open up all the way to 1.2 or 1.4, and that’s okay! However, that’s why the 85mm/1.2 lens is so much more expensive than the 85mm/1.8. Being able to open the aperture up that wide is a big deal for some people. But… it comes with a hefty price tag! 😉
The third of the four settings I set up first when shooting in manual mode:
3. Shutter Speed
I typically spot meter whenever I’m shooting. That means I meter (or read the light from,) one particular spot in the frame. (Usually my subject’s skin.) This helps me get a good reading for what my shutter speed needs to be.
There’s a little bar with tick marks on it in your camera’s viewfinder that lets you know when you have a correct exposure. To find it, you watch the line that falls on each mark when you point your camera at different things.
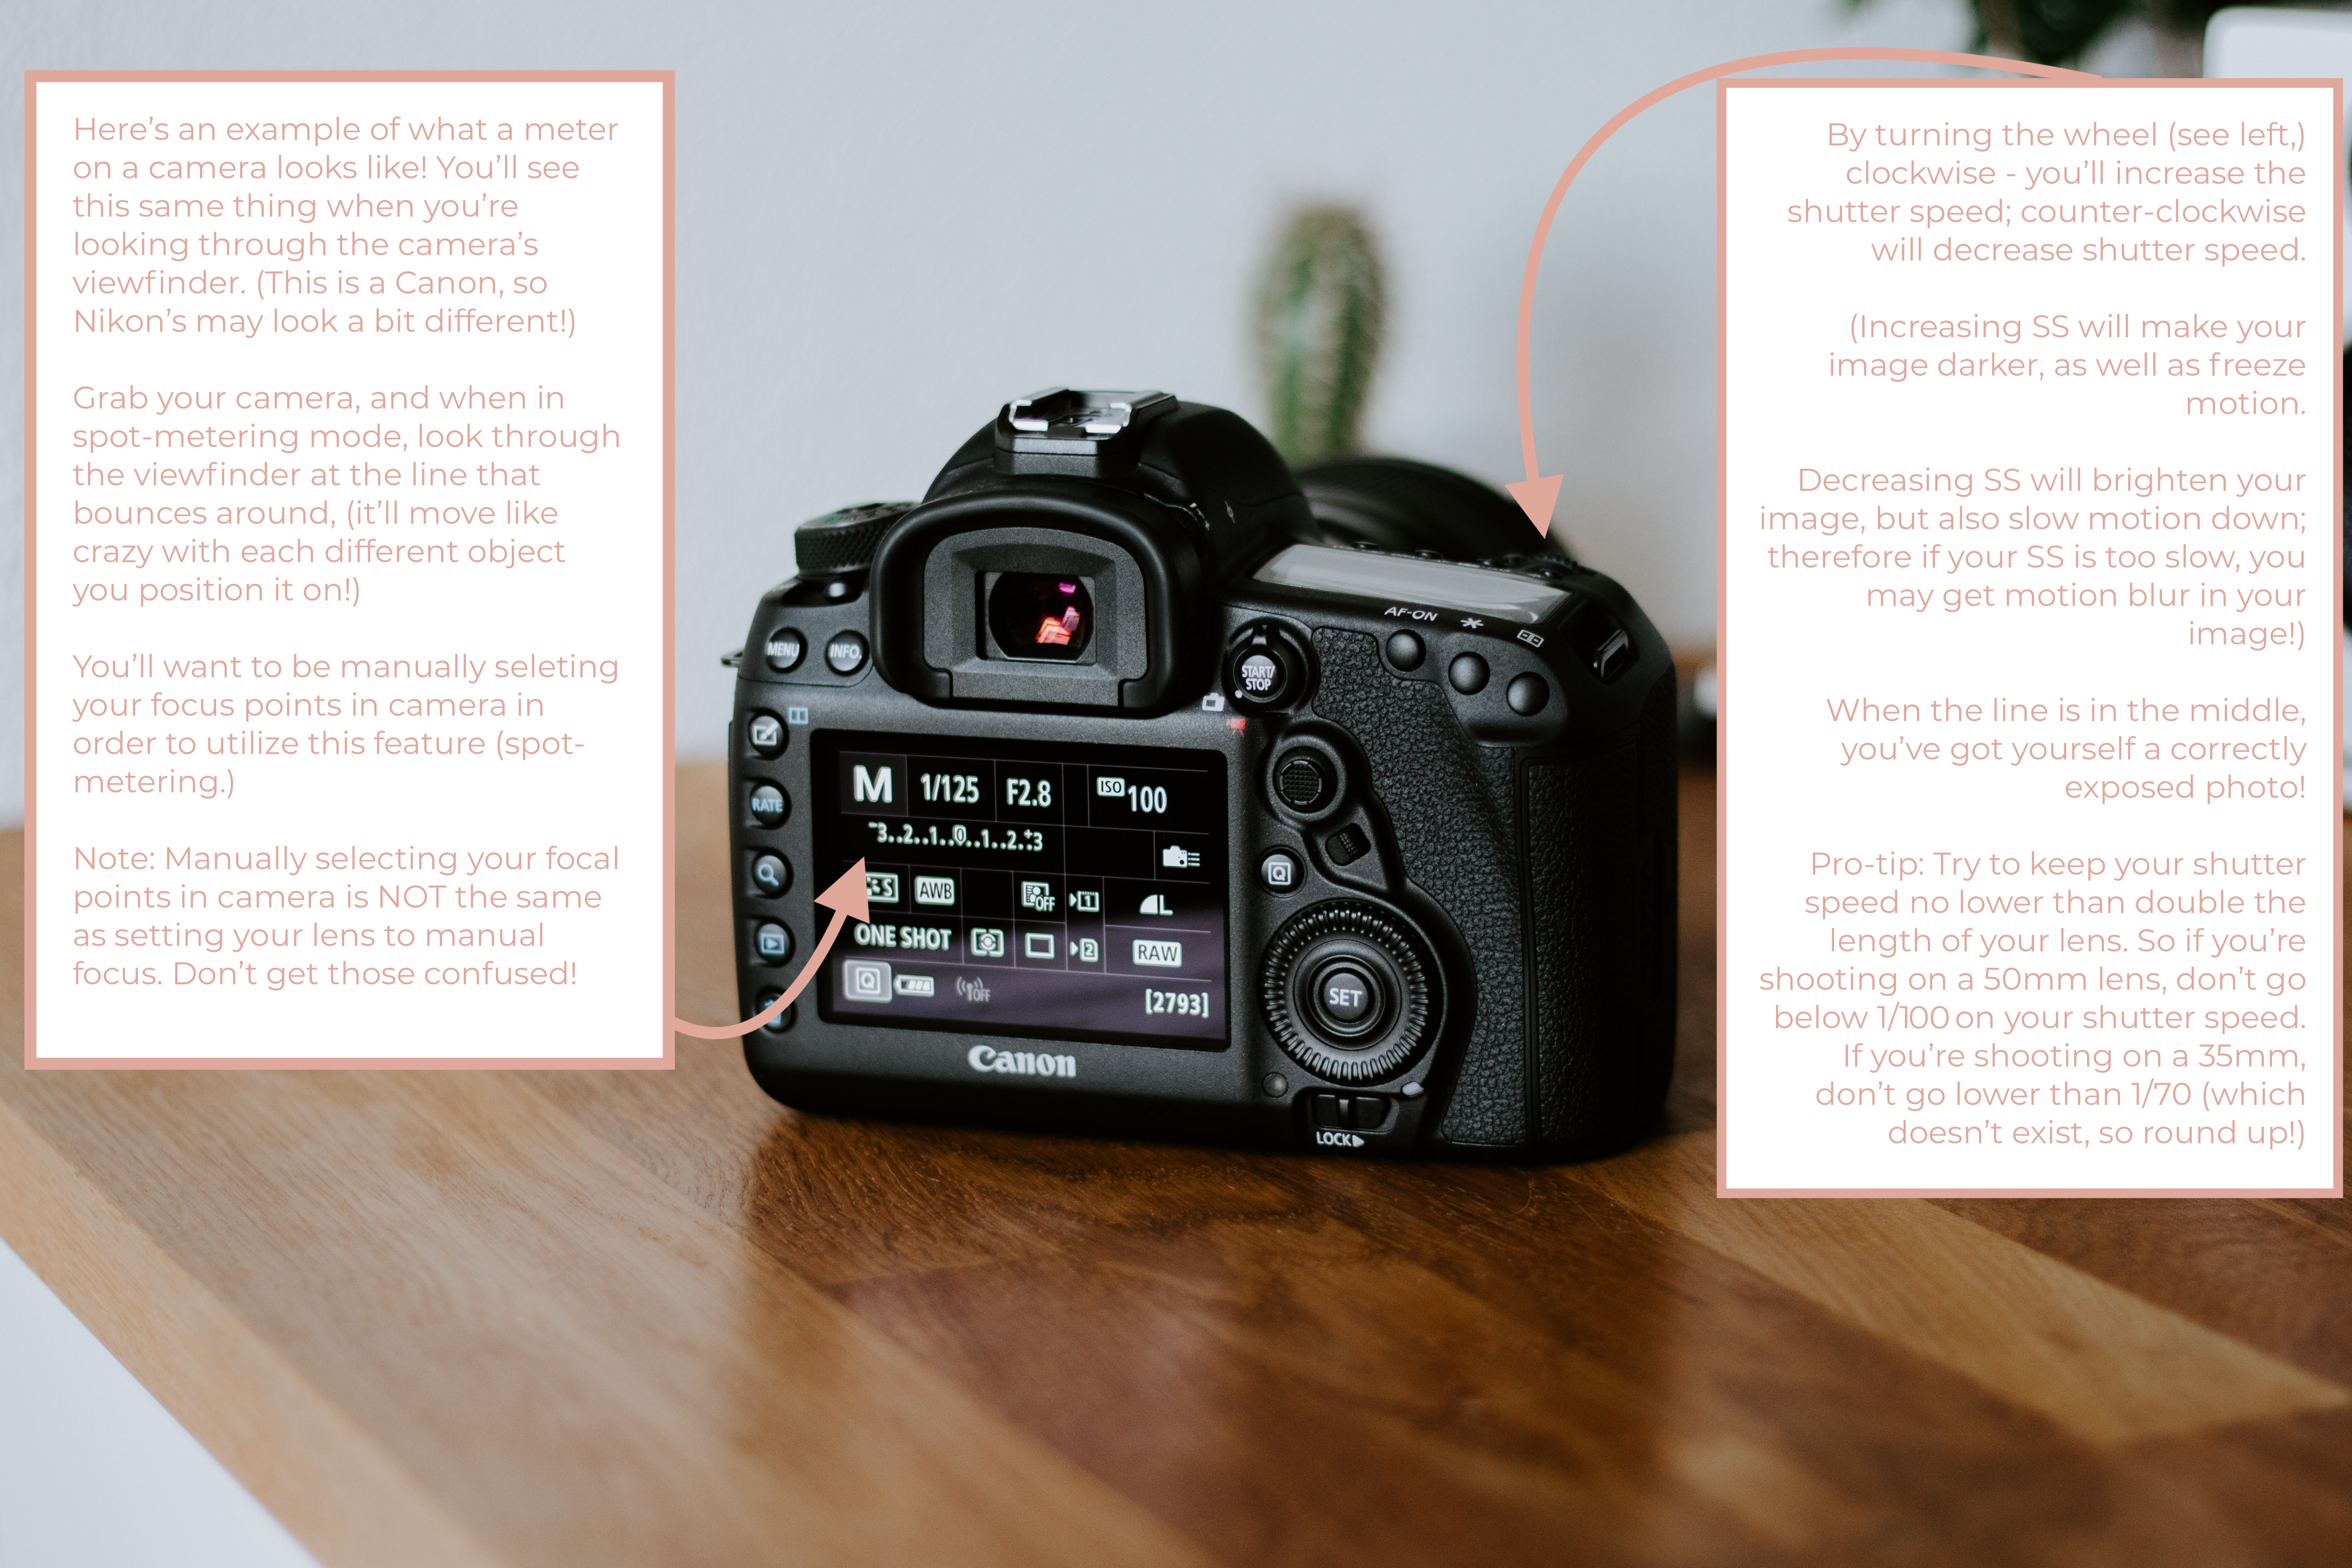
I generally make sure that line is about ½ a stop to the left of the 0. (However, on the 0 is considered a correct exposure.) So if you’ve ever heard someone say they typically underexpose their images, that’s what they mean!
Some people underexpose a lot, some people don’t at all, and some people overexpose! It’s all about what you like. Keep in mind that underexposing or overexposing too much usually won’t end in your favor!
And lastly, the fourth and final setting I set up when shooting in manual mode:
4. White Balance
I shoot using the Kelvin white balance scale (instead of shooting in auto white balance or any other mode.) You totally don’t have to. I just find it helps me see the final picture easier, and saves time in my editing workflow.
The Kelvin white balance scale runs from 0-10,000 on my camera. Here are a few shortcuts for what I typically set it to, depending on the given environment:
Kelvin White Balance Tips:
Portraits outside in harsh sun: 5,000 ish
Portraits outside in shade/cloudy day: 7,500-10,000
Portraits outside in golden hour: 6,500-7,500 ish
You can totally search on Pinterest for Kelvin white balance tips; there’s def a ton out there! However, I generally like my shots on the warmer side, so I’m typically shooting between 7,000-10,000 majority of the time.
And there ya have it, that’s the 4 exact settings I set up first in camera! ??
If this was helpful, or if you have any questions whatsoever- let me know in the comments below! I’d love to help ya get unstuck friend!
If you need help building, growing, and/or systemizing your photography business, totally reach out and book a free strategy call with me. Helping you flourish is what I do best. 😉

If ya liked this little gem, you’ll LOVE this guide on how to create a photography business with zero competition. (Cause that’s what we all want, right!?)
Wanna stick around and stay learnin’? I knew I liked ya. ?
Feel free to binge on these blog posts, or pin ’em on Pinterest for later! ??
If you’re short on time, follow me on Pinterest – and you’ll get these kinda tips delivered straight to your feed! You know… when you’re scrollin’ through Pinterest with coffee in hand, ready to take on the day… or, procrastinate.
Whatevs. Pinterest biz sesh, anybody!? ??


Read the Comments +