Productivity isn’t something I was always innately good at. I truly think it’s a learned skill, especially when working from home. It’s taken a lot of research, testing, tracking, and tweaking for me to get where I feel good about a certain system or schedule that really works for me, but I’m pretty confident about the one I’ll be sharing with you today. ?
After about 6 years, I’ve finally found a system that works well for me, and truly makes me feel productive when working from home. Now, you may be different and work better with other systems, and that’s totally okay!
But if you’re anything like how I was in the beginning, you just don’t know where to start; and wish someone would open up the barn doors to their biz to show you how they’re doing things, (so you can swipe some tricks and then make them work for you!) So that’s exactly what we’re gonna do. ?
1. SET ACTUAL WORK HOURS FOR YOURSELF.
I used to be SO bad at working from the time I woke up until the time I went to sleep. I didn’t have limits set for myself, so all I knew to do was work. (Granted I seriously love what I do, but still. There’s got to be some boundaries!) This meant I had no system or routine, and ya’ll – I thrive with a plan to follow and things I can check off a list. ??
By setting work hours for yourself, you’ll actually be more productive than if you were to work longer, differing hours (or ones that aren’t set in stone) each day. Why? Because you’ll know you need to get done “x” amount of things done by “x” time. A deadline keeps you motivated. My work hours are 9am-4pm. These are the hours that I’m most productive, so I’m maximizing my time during them.
(However, when I have big projects or a lot going on, I’ll temporarily extend my work hours until 6pm-ish, but adjust them back once the big project is completed, or my workload lessens.)
To get started using work hours at home, decide on what hours of the day you’re usually the most productive. (Or if you have another job as a 9-5, then it would be hours outside of that!) Set your work hours for the times you’re usually the most productive/motivated.
Then, at the beginning of your day (prior to when your work hours officially start,) make some coffee and sit down with your planner to evaluate what you need to get done for the day. I recommend choosing your “big three,” which are the top three things you absolutely need to accomplish that day. Once you officially start your work hours, start tackling your list one by one, starting with the highest priority task on your list first.
At the end of your workday, (the last 30 minutes or so,) flip to tomorrow’s date in your planner and write down the overflow of tasks that you didn’t get done today. These will be what you now need to do tomorrow.) By doing this, you’re setting yourself up for success for the next day!
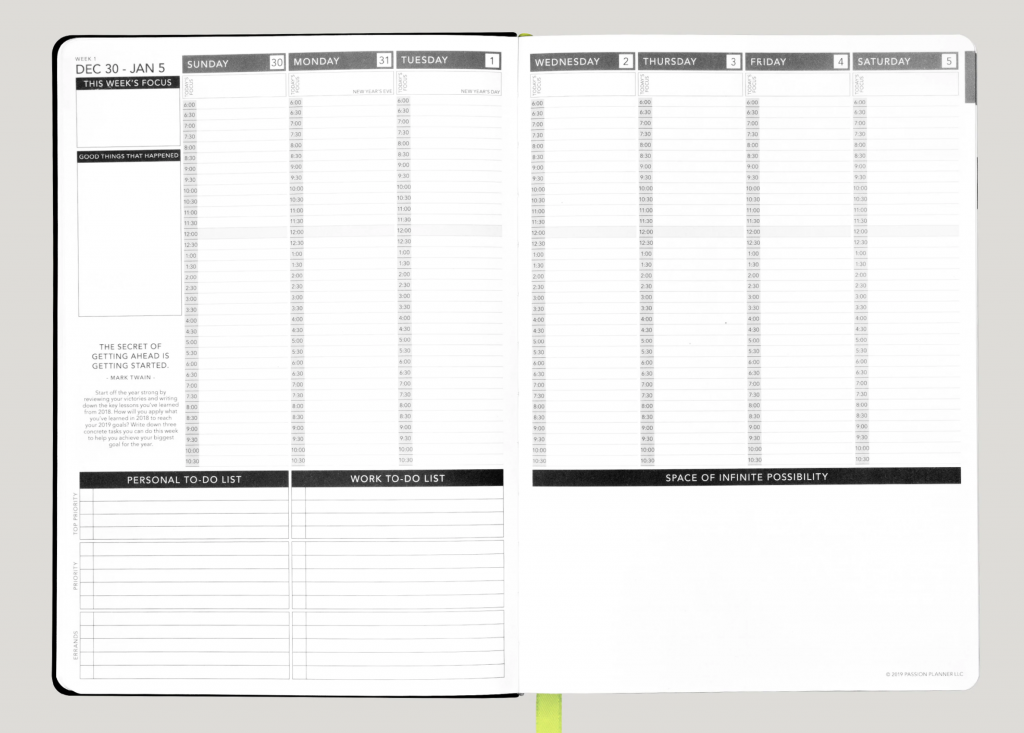
Need a planner to fall in love with? My FAV planner EVER is this one by Passion Planner. I love this one because it allows you to view you week and your days in 30-minute increments, which is essential for us to stay hyper-focused during the day. I’m a huge fan. They also have an undated version if you prefer that, but the dated ones are on sale significantly right now (like half-price since it’s already May!)
2. CREATE “BATCH DAYS” FOR YOUR BUSINESS.
Batch working is basically categorizing your days into “buckets.” Each day, you only do that day’s category of work. If something comes up that’s out of that category of work (I.e. maybe it’s a marketing task and today you’re just focusing on client work,) then you just dump it onto the to-do list for your “marketing batch day.”
I first learned about this concept from Ashlyn of Ashlyn Writes, and I can say it’s definitely been one of the greatest tools I’ve implemented to increase my productivity. Here’s a blog from her all about how to organize your work schedule into batch days! So do that, and then come back here. ?
Here’s an example of what a “batch-day” system could look like for a photographer:
- MON – BLOG POST DAY
-
-
- AM: Batch writing blog posts for session blogs & personal blogs, etc.
-
-
-
- PM: Editing/formatting blogs, optimizing for SEO, plugging into WordPress and scheduling
-
- TUE – CLIENT WORK + CALL DAY
-
-
- AM: Working on emails and communication w/ clients, planning out sessions, catching up on editing, requesting testimonials, etc.
-
-
-
- PM: Chatting with potential clients/leads on the phone, (if no calls scheduled, work on bettering your call scripts for when you do have them.)
-
- WED – MARKETING DAY
-
-
- AM: Planning out this week/month’s social media & newsletters
-
-
-
- PM: Writing captions in a Google Doc, choosing photos for IG & pairing them with relevant captions in Planoly, batch pinning pins on Pinterest via Tailwind, designing graphics needed for marketing materials via Canva or Photoshop, etc.
-
- THU – PRODUCT DEVELOPMENT DAY
-
-
- AM: Brainstorming new products/offerings you could create for your clients
-
-
-
- PM: finding ways to better serve your current customers and potential clients, creating products and systems for new offerings, etc.
-
- FRI – VISUALS DAY (WEBSITE + EDITING, ETC.)
-
-
- AM: Editing LR catalogs/photos for currently clients
-
-
-
- PM: Uploading photos to your gallery delivery service, sending out galleries to clients, uploading new photos to your website/website maintenance.
-
3. CREATE AN INTENTIONAL, METICULOUSLY-CRAFTED SCHEDULE TO GO ALONG WITH YOUR NEW WORK HOURS + BATCH DAYS.
Okay, so now you’ve decided what your work hours are, and the type of work you’re going be doing on each day of the week. Awesome. But how are you going to actually stick to them…?
Well, you’re gonna need a plan and some systems — that’s how. We’ve gotta make sure you’re optimizing those hours for maximum efficiency. ?
Every day, I’m constantly utilizing four very important resources:
- ClickUp – (my online project management system)
- My passion planner (my written planning system)
- Google Calendar – (the calendar that literally every single thing I do is synced to)
- Honeybook – (my photography CRM)
Sound like overkill? Maybe to some, but I’ve NEVER been more productive once setting these four systems up! Seriously, with these, I feel like I can take over the world. ?
So how do these all work in tandem? What purpose does each really serve and how does it fit into the puzzle of a productive schedule? Let’s hop in and take a look!
MY ENTIRE PRODUCTIVITY SYSTEM, REVEALED:
THE VIRTUAL MOTHERBOARD: CLICKUP
- Clickup is actually my home-base/business headquarters. Think of it like this, Clickup is the headquarters for JVP, housing both the education and photography business facets of my business. It’s like a warehouse. My google calendar, passion planner, and honeybook are just offices inside of that JVP warehouse; that make sure business is gettin’ done right. They actually have a free version too, which I both love and use! ? ClickUp is CRAZY robust. Seriously, out of all the project management systems that I’ve tried (asana, trello, etc. – it’s my all-time fav!) It’s def built for those CEO vibes and for you to be able to scale, which are my fav things. ?
Here’s a peek inside just one section of my ClickUp, my Blog Management system:
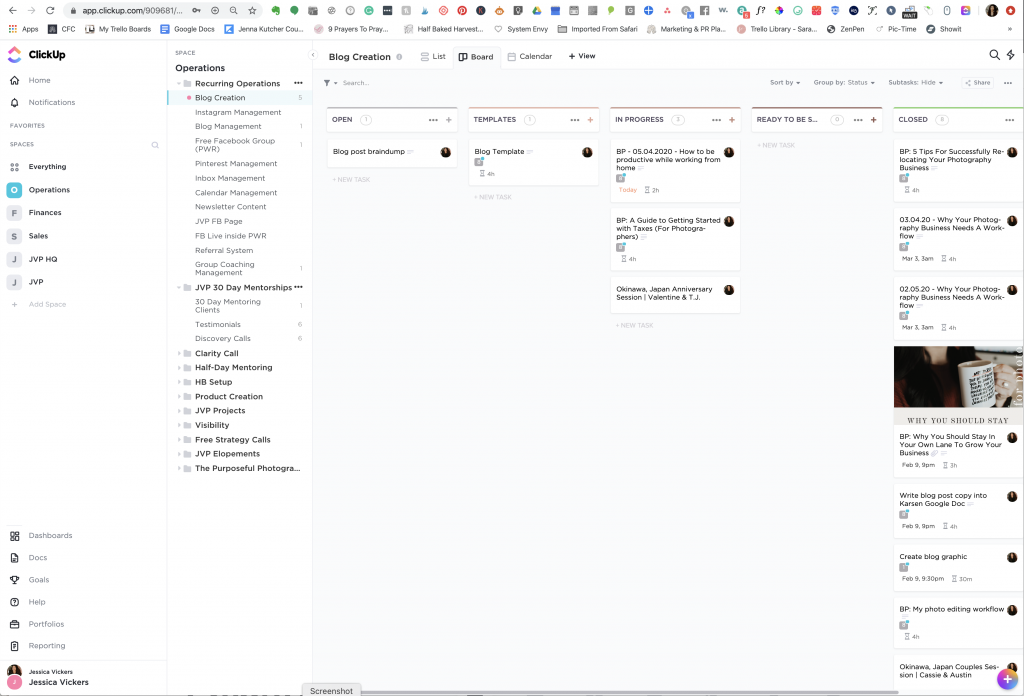
This is my blog creation process, under recurring operations, (a fancy way of saying “the tasks I’m repeating every single week that constantly need my attention.”)
I have four different workspaces set up inside of ClickUp:
1) Operations (which has everything you see on the sidebar under Operations in it)
2) Finances (this is where I’m setting revenue goals for the year and each quarter, keeping track of accounting/bookkeeping, tracking expenses and P&L, and housing all of my financial google sheets, etc.)
3) Sales – (this is where my yearly, quarterly, and monthly sales/marketing strategies reside, along with ad management/tracking, etc.)
4) JVP HQ – (inside here is my brand info (brand voice guide, branding elements/colors, etc., some goals, development/research for things, courses I’m taking and my progress on them, books I’m reading, my course wishlist, software/programs to try, etc. Just a braindump of all the things!)
* The JVP underneath that JVP HQ needs to be deleted, so ignore that!
ClickUp helps me to stay on task, and have a home-base to house everything under the sun (pertaining to my business) in! You can try it out for yourself here.
THE WRITTEN PLANNER: PASSION PLANNER
- During the week, my passion planner is always opened to the weekly view. I love this particular view more than the others because it shows me my daily schedule via 30 min increments. (See below.) This view allows me to write out what this week’s focus is (at the top left), as well as my to-do list for personal and work (at the bottom left), and there’s some extra area for jotting down notes (at the bottom right.) I personally prefer being able to cross things off a tangible list with a pen, so that’s why I use this in tandem with my Google calendar and Clickup!
THE TIME-MANAGEMENT SYSTEM: GOOGLE CALENDAR
- Google calendar is where I’m able to see exactly when I’m supposed to be focusing on each type of task, as well as when to move onto the next one. One of the awesome things about Google Calendar is that you can have multiple calendars inside of a calendar. This is SO amazing because you can see everything all together if you want -or- you can toggle on/off certain calendars you don’t want to view, with just one click of a button. That may be a little confusing, so let’s look at this in action!
Here’s my master calendar view:
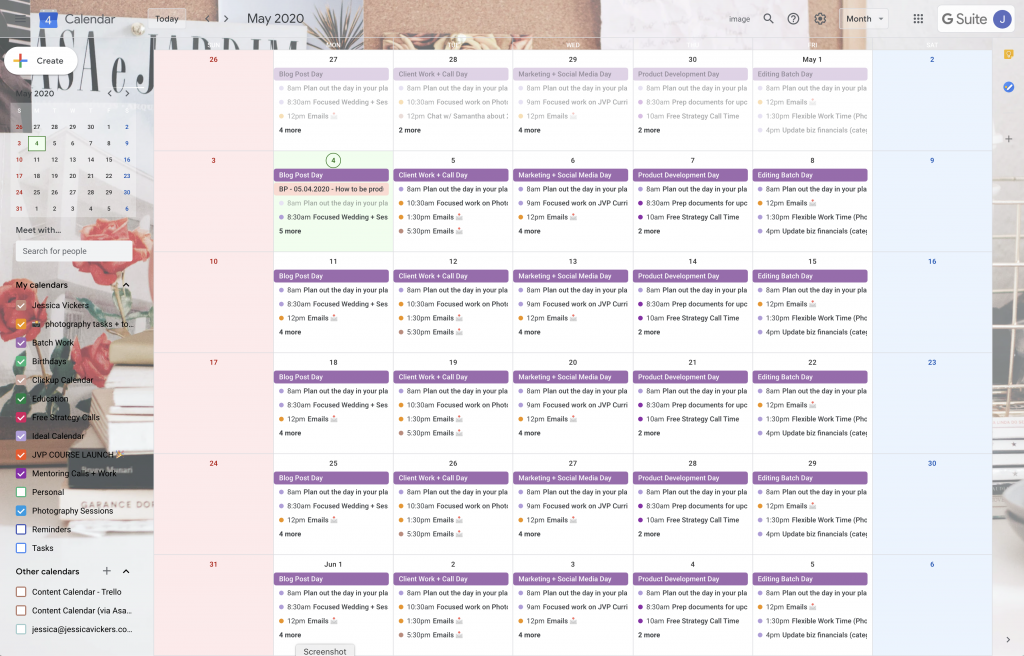
I have every single task (aside from personal tasks,) currently visible on here!
But since you can’t see everything because there’s so much; here’s a different view, my weekly one:
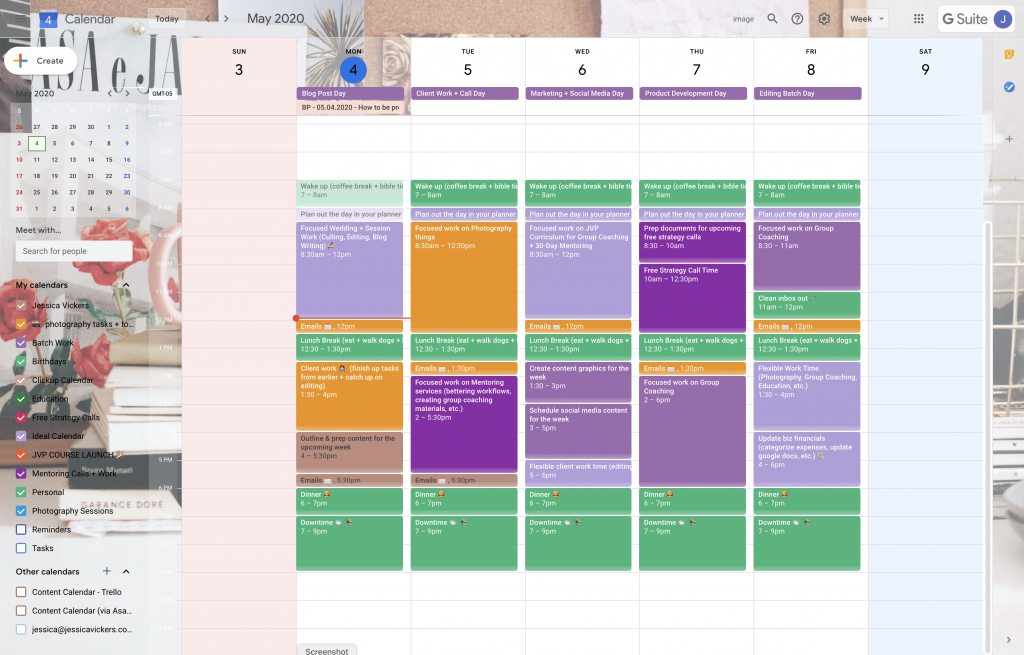
See how I have literally every hour scheduled out during the day, according to the type of task I’m working on during it? I don’t take calls or texts from family or friends during this time, (or well, I try REALLY hard not to, unless it’s urgent.)
Each calendar inside of this master calendar is color-coded according to the type of work it pertains to. (You can see the different calendar types to the left!)
Having this direction, and these boundaries, helps me to accomplish SO much during the week! So, get to building yourself a calendar that works FOR you, not against you. ?
“Always plan ahead. It wasn’t raining when Noah built the ark.” ― Richard Cushing
“Unless you have definite, precise, clearly set goals, you are not going to realize the maximum potential that lies within you.” ― Zig Ziglar
THE CLIENT RELATIONSHIP MANAGER (CRM) – HONEYBOOK
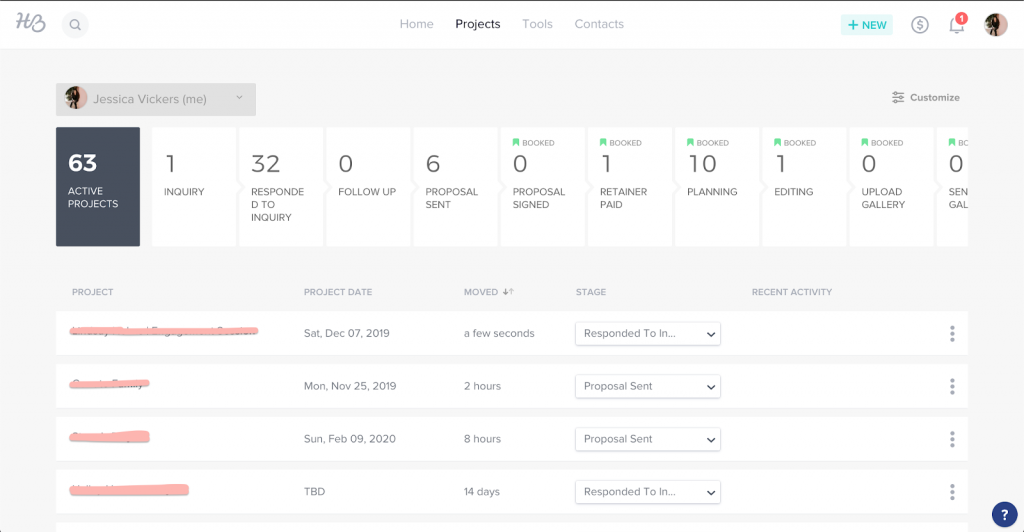
- Honeybook is what manages my entire photography and education business in terms of clients, (so all things client communication (emails, proposals, payments, contracts, etc!)
So if someone books me for an elopement/intimate wedding, a couples session, brand photos, or a mentorship — they’re doing it all through here. Basically, it’s where the cash register dings ? and the contract-birdies sing. (Idk what happened there.) Moving on. ?
Here’s a BTS view at what the home-base for Honeybook looks like:
Some other useful “work from home” tips:
- Create a workspace that’s designated for work:
-
- Try to keep it separate from your rest/family time areas if possible. (And bonus points if you can make it pretty and motivating!) One of the best things I did when living in my tiny apartment in Japan was creating a pretty, motivating workspace. It truly changed the game for me! (Missing it so much right now, it’s all being shipped across the Pacific currently!)
-
- For tips on how to create a vision board like the one below, check out this blog post!

- Try using the Pomodoro technique:
-
- The Pomodoro technique is basically working on a specific task in intervals of 25 minutes on and 5 minutes off, for as many sessions as you need. Then, after about four Pomodoro sessions, you’ll take a longer break (usually around 20-30 minutes.) So instead of dragging along working on the same task non-stop, (which usually always leads to distraction,) you work in shorter, more focused bursts! This works SO well for my productivity levels, especially for culling + editing!
- Listen to productive music/sounds, instead of regular music:
-
- One of my personal favs is Brain.fm! It’s one of the greatest tools for productivity. I’d always heard about how listening to a certain kind of music helped you focus, but this app is legit. I listen to the focus channel in Brain.fm every time I need to write a blog post, and I always stay super focused and pump out the best content when I do. It’s also awesome for editing photos!
-
- I also love this youtube video, I seriously play this coffee atmospheric track on repeat!
Once I finally sat down and began to develop a system that actually worked FOR me, I started to see major improvements in my productivity levels. I’ve accomplished more in my business in the last year using these systems than ever before!
I know getting these set up is quite a task, but once you have them up and running, you’ll be blown away at how much more you’ll accomplish. ??
Do you think this will help you get more accomplished, and finally have a plan for your biz? I sure hope so! If you have any questions, don’t hesitate to ask. You can post them below in the comments, I’d be more than happy to help! ✨
Disclaimer: some of the links in this blog post are affiliate links, which means I earn a commission if you sign up with them! They help keep the lights on over here, so I greatly appreciate it! ?
Wanna work with me 1:1 to get my eyes on your photography business, and help you fuse your faith into your biz?
You got it, friend! Click the link below to schedule a discovery call to see if we’d be a good fit to work together! I’ll start prepping your strategy in a Google doc now! ??
Looking for more helpful photography tips? Feel free to binge on these blog posts, or pin ’em on Pinterest for later! ??
If you’re short on time, follow me on Pinterest – and you’ll get these kinda tips delivered straight to your feed! You know… when you’re scrollin’ through Pinterest with coffee in hand, ready to take on the day… or, procrastinate.
Whatevs. Pinterest biz sesh, anybody!? ??




Read the Comments +